Trim and split clips are of high importance in the world of video editing. You can pick up the right pieces and eliminate the unnecessary ones through these two features. At the same time, you can apply transitions, add filters, and be extremely creative when you separate videos into multiple parts. Whether you’re using the editor for the first time. Or you have just upgraded to the newest versions like Filmora 11; spitting and trimming is not a mountainous challenge. This article sheds light on Filmora, its core features, advantages, and a complete guide to help you split and trim videos.
What is Filmora?
Filmora video editor makes the video editing journey quite amusing and creative. The software is available for both PC and MAC users. You can download Filmora for free or purchase the tool to savor exclusive features. Filmora has an effortless interface – one of this software’s most appealing traits. It has a perfectly balanced timeline section to allow you to view and manage various images, overlays, video clips, and audio files. Also, the interface offers a straightforward drag and drop feature so you can quickly arrange and edit different media elements. All the basic editing tools can be seen on the front panel. You can also find advanced editing options by double-clicking the timeline clip. This software makes it easy to add, delete, and rename tracks. Filmora also supports many video file formats, and you can import files to its media library directly from your computer. Moreover, this video editor allows you to import files from your social media accounts, like Instagram and Facebook.
While the Filmora 11 is a new kid on the block, users also find many charms about the previous versions, like Filmora 9 and Filmora X. This editing tool offers different preset elements that you can include in your video clips. Furthermore, it makes a great simple video splitter and trimmer to freely use in your portable devices like laptops.
Features of Filmora
Downloading Filmora 12 gives you access to numerous new features, including:
- Speed ramping
- Auto beat synchronization
- Instant import mode
- NewBlue FX and Boris FX plugins
- Access to Wondershare Drive
Other core features available in Filmora 9 and later versions are:
- Green screen and split screen
- Color match and masking
- Audio ducking
- Motion tracking
- Speed adjustment
Advantages of Wondershare Filmora
- Ample UI
- Free trial available
- Low learning curve
- High-quality media export
- Numerous presets and add-ons
- Safe and royalty-free music library
- Responsive telephone and email support
- Fast cutting, trimming and splitting videos
- A great list of filters, effects, and transitions
Steps to Split Video in Filmora
Filmora has a really simple method of splitting videos, making it a favorite video splitter app for millions of users.
Import Your Video File into Filmora Media Library
Open the software and choose the “Import” button.
A new window will appear, enabling you to choose the file from your computer or laptop’s hard drive. Select the file and click on the “Open” button.
Drag and Drop Video on the Timeline
After importing the video library, click and drag the video and drop it into the timeline. If you have placed the clip on the right track, you will be able to see it on the preview screen.
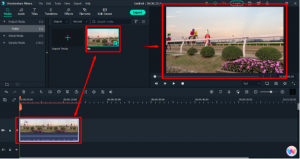
Before splitting the clip, make sure you zoom the track/timeline by clicking multiple times (as required) on the “+” icon under the preview screen.This isn’t a mandatory step, but doing so will help you choose the right point to split the video. Also, detach the audio file if your video file has some sound.It is up to you whether to delete the detached audio file. In this tutorial, the audio was deleted since it was not required.
Use Playhead to Split the Video
The orange marker is called playhead. Grab it using your mouse and place it over the frame you want to split. Then, click on the “scissors” icon on the playhead bar to make the first slice.
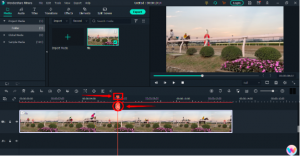
Immediately you will see that previously the one long video file is now in two separate parts, like this.You can move the two clips and arrange them the way you want. If you see the screenshot below, you will notice that there are now two parts (Clip1 and Clip 2) with a gap in between (red square).But make sure to fill the gap if multiple clips are further on the track. Otherwise, you will see a “black” display on the preview and at export. So don’t leave any empty spaces.
Steps to Trim Video in Filmora
Trimming is applied to the beginning or end of the clip. It requires adjusting the video track by grabbing the corner of the video. For this demo, the end of the track is selected to show how trimming is done in Filmora.
Keep Playhead at a Specific Frame
Play the clip and find a point that you want your video to conclude. Then, place the playhead on that certain frame to act as a border.
Drag the Corner of the Video to Trim
Click once on the video track to select it. Place your cursor at the edge of the clip until it changes its shape. Then, click, hold, and drag the clip backward until it reaches the playhead position.
Export Your Media
When you are finished splitting and trimming, click the “Export” button to save the video on your computer. To learn more detailes, check Split Videos into Small Parts Online or on Computer.
Conclusion
Filmora editor is your gateway to simple and fast video editing. The software offers some of the best and most trendy filters, transitions, and effects to use on your clips. Splitting and trimming videos is also easy. You can slice and hide the unwanted parts to make your clips flawless and entertaining.
FAQs
What is the difference between trimming and splitting in video editing?
Trimming means hiding either part of a video’s end or beginning. While splitting cuts your video clips into two or more parts.
Do trimming videos lose quality?
Some users think that trimming makes minor changes to the video quality. However, there is no confirmation of this fact. But if you use a great video editor like Filmora, you don’t get to lose the quality of your clips.
Does splitting a video delete the original?
Splitting the video into two portions will only divide the full video into two different parts. The original content will still be available to you. If you do multiple splits to remove a particular portion from the clip, you can lose the part of the original footage once you select and delete it.
- Tags:
- Videos in Filmora
The point of view of your article has taught me a lot, and I already know how to improve the paper on gate.oi, thank you. https://www.gate.io/signup/XwNAU
The point of view of your article has taught me a lot, and I already know how to improve the paper on gate.oi, thank you. https://www.gate.io/ja/signup/XwNAU
Your point of view caught my eye and was very interesting. Thanks. I have a question for you. https://accounts.binance.com/uk-UA/register?ref=B4EPR6J0
Your point of view caught my eye and was very interesting. Thanks. I have a question for you. https://accounts.binance.com/kz/register?ref=YY80CKRN